Uploading Files Using Media in Drupal 7
Overview
This tutorial will outline how to install and configure Media ii.0. We will create nodes with file fields (which can be documents, images, videos, etc) and configure the display of these fields.
Every bit Media has adult, it has used many different approaches, and then old sites are left with a jumble of overlapping features and it'southward incredibly confusing. Hopefully this tutorial will help outline the suggested method for approaching managing media on your Drupal site. (Please provide feedback if in that location are meliorate ways to handle things).
Fundamental to this result is that Drupal ships with several features that are like to Media. The ability to upload files and images is not replaced by Media, only rather supplemented. This ways that the user is left with both options (if not more) and must somehow know which one is the congenital in (not to be used), and new (preferred method).
For a collection of useful materials for anyone working with media modules in Drupal, see Resource Guide: Managing Media in Drupal.
Modules Used
- Media 2.x
- File Entity
- Entity View Manner (optional)
Media along with File Entity, provides a fashion to manage the storage and brandish of all types of media or files. Information technology does this past creating new File Types such equally Document (PDF, etc), Audio, Image, and Video. When you add a File field, Media takes over. It lets yous configure additional fields for each File Type, such as an "Epitome Tags" field for the Image File Type. And so, when yous upload an Image, yous can provide more details for those additional fields. From a display side, you can set up unlike View Modes and determine which Styles are used. (That office is confusing, so see below.) Most of this is done automatically for you which is different than the normal Drupal method of configuring most stuff by hand. If yous have used field collections before, think of Media Files every bit Field Collections that can have any number of fields.
How Does a File Become its Style?
In cursory (we'll go over it with images later) this is the path a file takes while being displayed.
File Field is used in a content type.
Media File Selector Widget is used which handles how a file is stored AND displayed. This widget decides which File Type each value of the field is and from then on, that file type will exist used. You Practice Not select this every bit a user.
View Way is and then selected. This is similar to the Default and Teaser View Modes that you have for nodes. This is the option you lot make when managing the content type's display.
Displays (Display Handlers) are really a set of means to handle a file. You lot select a number of these Displays and Drupal will start at the meridian and try to use that method. If it fails, it goes to the side by side ane. For example, if y'all pick Prototype for a text file, it can't brandish an prototype, so it will try the side by side option, such every bit URL to File.
Display Handler Settings are farther options to configure how each Handler works. Build in Paradigm Styles are one fashion that Drupal manages the display of Images. These are available here. You can create a new Image Style (such as a 75px past 75px thumbnail) and select it as an Epitome Handler Setting. Not all Handlers have settings.
Theming then takes over.
Note on Theming: There are multiple template files yous can apply for files themed this style. The easiest is structured equally such, file--<file-type>--<view-mode>.tpl.php. For instance: file--prototype--preview.tpl.php or file--video--my-custom-view-mode.tpl.php. For a template (of the template), use the file_entity.tpl.php file inside the file_entity module.
Example
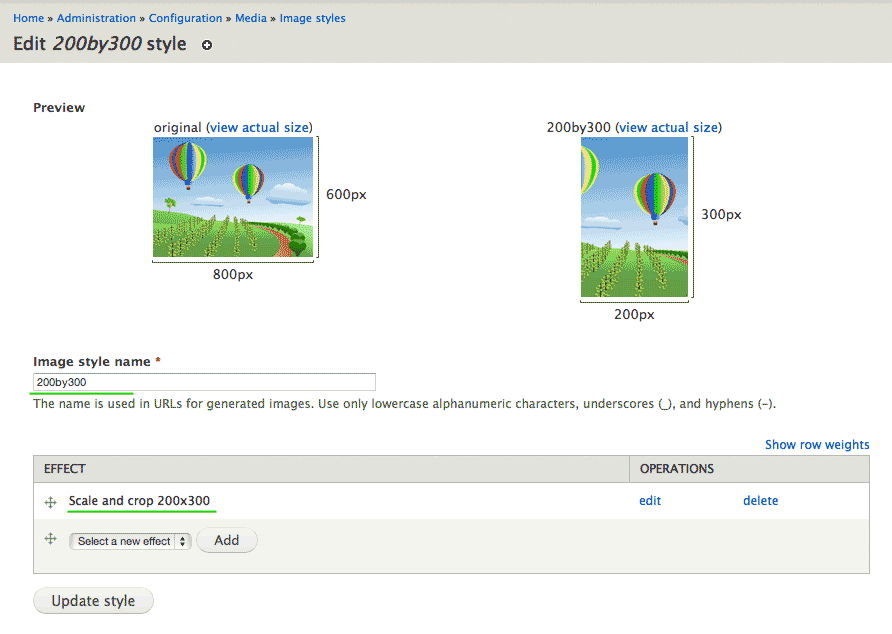
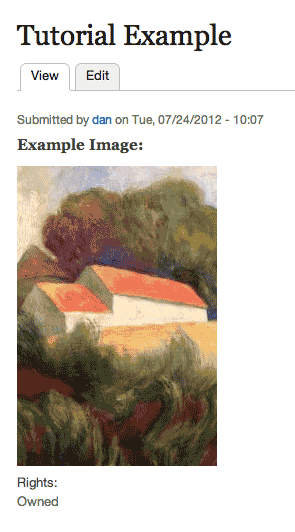
We desire to add together an image to our node and have it brandish as a 200px by 300px image.
Nosotros offset create a File Field and select the Media File Selector Widget. Then nosotros select settings so that only images can exist selected, otherwise use the defaults. For our 200px by 300px selection, nosotros create an Image Style called 200by300. We then edit the Default View Mode for the Image File Blazon and select the Image Handler. Then under the Prototype Handler Settings, we cull our 200by300 Image Style.
Now, with Screenshots!
Screenshot Tutorial
Please meet the case right in a higher place for a description of what nosotros are going to do.
Add a Media Field
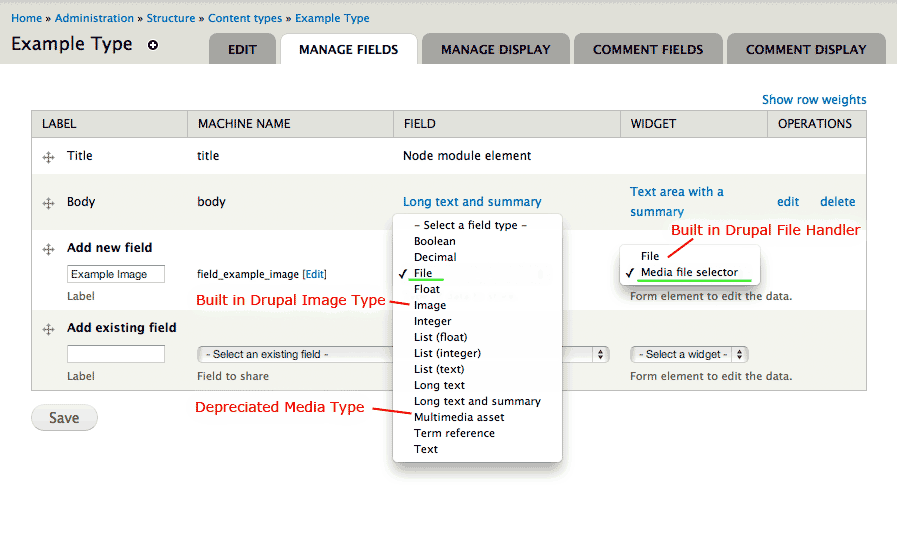
Configuration path: admin/structure/types/manage/example-type/fields (Manage Fields under Content Blazon)
Here we create a new field, called Example Image. We select the File field type and the Media File Selector Widget. (Annotation: we do NOT select Epitome, Multimedia Asset, or the File widget.)
Salvage the first screen of Field Settings equally default (there are no options), then go to the next.
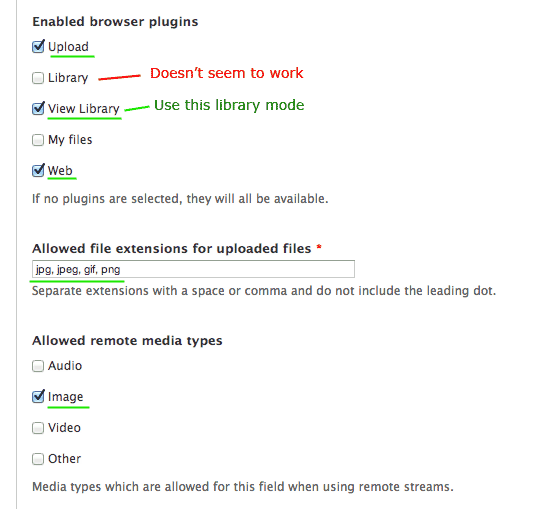
Note: In Media 7.x-2.0-unstable7, the old "Library" Plugin was removed, and "View Library" was renamed to "Library". If you are using this version of Media or later, utilise the "Library" Plugin wherever "View Library" is referenced beneath.
In the Field Settings screen above, cull which Browser Plugins you want. I recommend Upload, View Library, and Spider web. Upload will handle uploading image, View Library is the new way of searching for existing files, and Spider web allows yous to link to externally hosted files (such every bit Youtube files).
In the Allowed File Extensions field, enter the extensions you desire to utilize. We will choice, "jpg, jpeg, gif, png".
For Allowed Remote Media Types, nosotros will select Image since this is an image field.
Set Content Blazon Brandish Settings for the Field
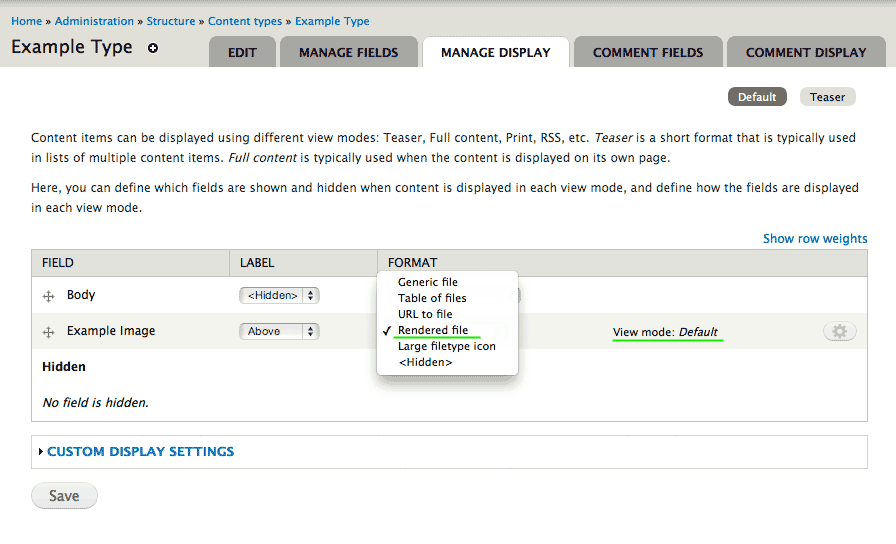
Configuration path: admin/structure/types/manage/example-blazon/brandish (Manage Display under Content Blazon)
Here nosotros select the Formatter. Nosotros want the Rendered File Formatter for our image. This formatter will let our Image to be handled by Media on the Display side and allows u.s. to option which View Way and Handler to use. Note the View Mode is prepare as Default. Nosotros tin can change this later, and we'll see where we set settings for each View Style.
Create an Epitome Manner
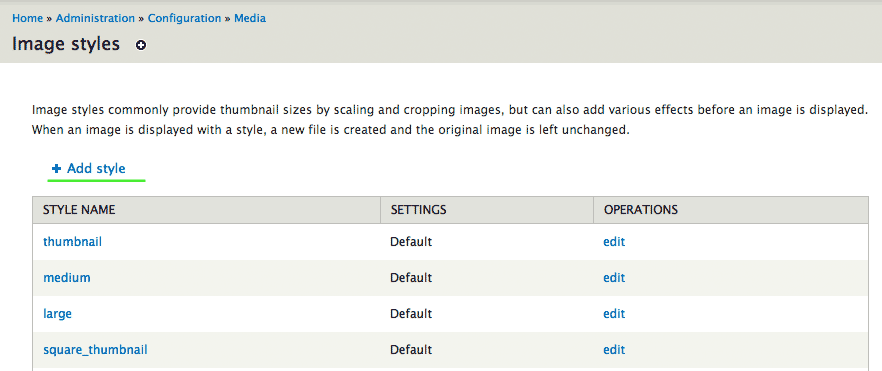
Configuration path: admin/config/media/image-styles
We want to add an Image Style to format the image to 200px past 300px. We add together the fashion here.
Creating Image Styles is a piffling across the scope of this tutorial, but we will create a simple one here. Apply the Calibration and Crop event and select 200px and 300px. Nosotros've created our new style!
Annotation:For more data on Paradigm Styles see the "Adding and changing styles" section of Working with images in Drupal 7 and viii. The remainder of that page is almost the core epitome module, you should probably ignore or skim over those sections.
Manage the Display of Images (Manage File Types)
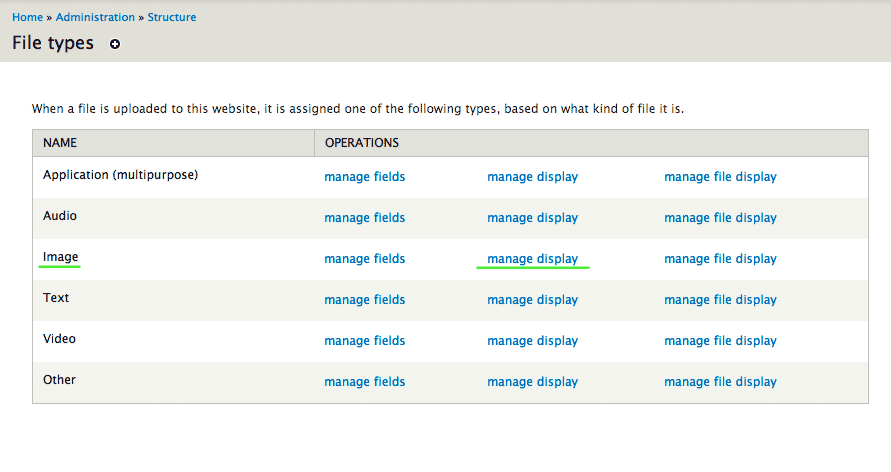
Configuration path: admin/structure/file-types
Here we can manage all of our File Types. This includes the extra fields for these types also every bit the Display using different View Modes. Finally, there is the File Display settings. This option is where we manage the display of the bodily file (which is the master field of this File entity).
Select Manage Display.
Manage our View Modes
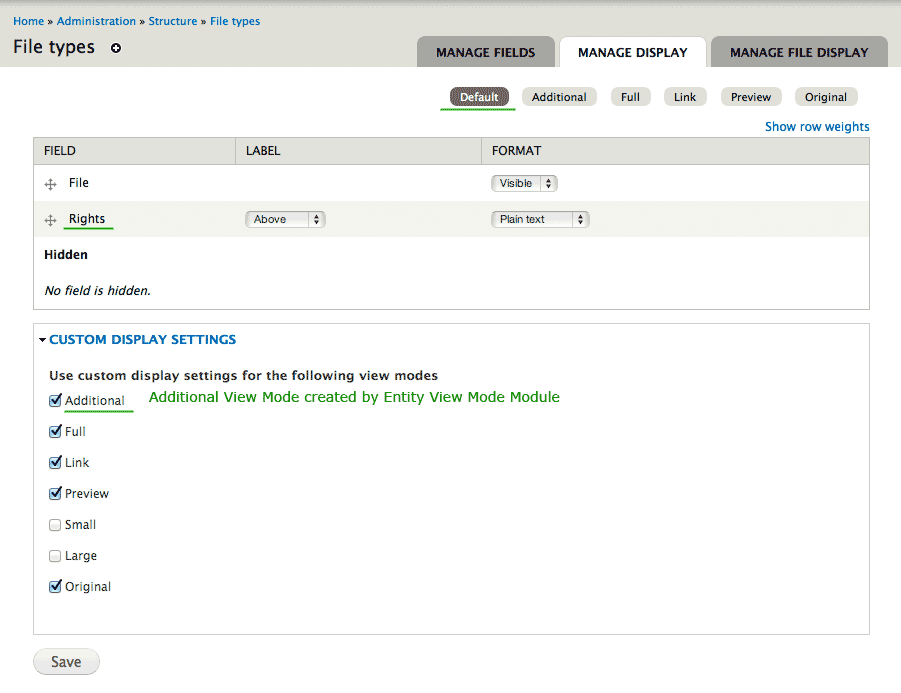
Configuration path: admin/structure/file-types/manage/epitome/display
Here nosotros can manage our view modes for Images. Under Custom Display Settings, we can select the View Modes that are available. The Additional View Manner was added by me using the Entity View Mode module. Once you articulate Drupal's Cache, you will see this view mode listed on the top right besides. By creating new View Modes, we can assign special means of displaying content.
You volition also see the Rights field that I added to the Image File Blazon. You can add any fields you like to the File Types and manage their display like a normal content type. This allows you to tag files or provide actress data on them. They are kind of like Field Collections if you take used those.
Manage How We Brandish the File
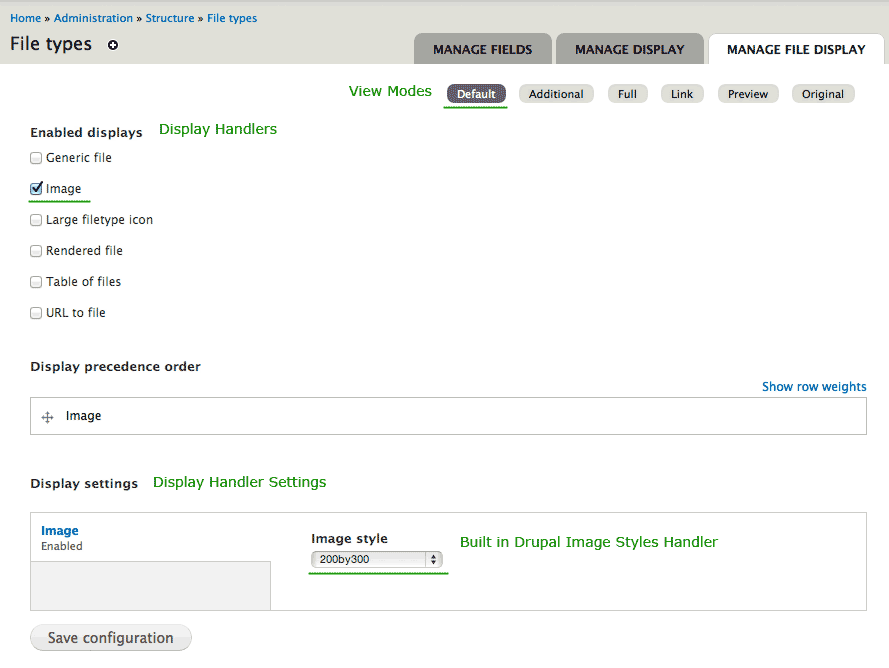
Configuration path: admin/structure/file-types/manage/image/file-display
This is the key location to manage how we display files. You see the View Modes in the height right, the Brandish Handlers on the left, and the Handler Settings on the bottom.
Think of the View Modes equally level ii tabs. For now, we are using the Default View Mode, simply we could create another 1 or use ane of the presets.
Then, since we merely want to display images using the built in Image Handler, nosotros select that. If you had Handlers that only piece of work for one type of file, such equally a Youtube handler for video files, you could select multiple to endeavour. Drupal will endeavour to employ the top handler first, and if it fails, information technology will employ the adjacent. So, if y'all have Youtube and uploaded video files, you could accept Youtube try to make an embedded view first, and so display the URL to file if that fails.
Lastly, our Image Handler lets united states of america select the Prototype Mode to use, and so nosotros'll option our newly created "200by300" style.
I believe the Rendered File Handler is used if yous want the module Styles to handle the rendering of this type of file. This is not covered hither, but it'south worth noting that the Handler has a disruptive proper name! Don't select it unless you know what it is!
Create a New Node and Upload an Image:
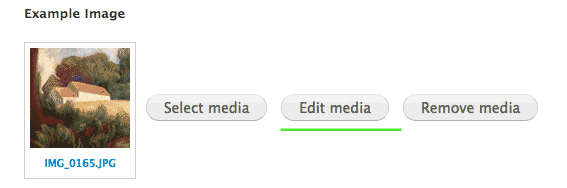
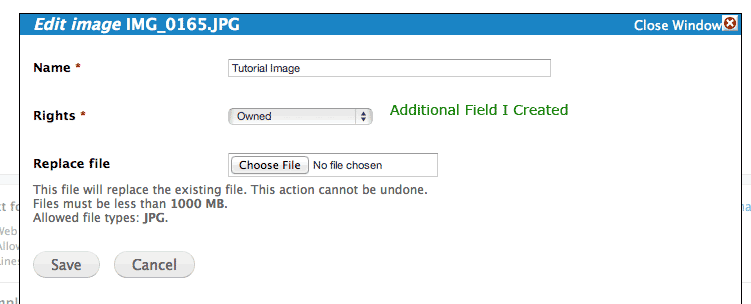
Uploading the image is fairly straight frontwards. Withal, once you upload it, you can select Edit Media to set up the Title and other Fields you lot've added. This process is a little confusing. And the UI is styled differently!
Test it Out
Source: https://www.drupal.org/docs/7/modules/media/media-2x-quick-start-guide
0 Response to "Uploading Files Using Media in Drupal 7"
Post a Comment